

During my gaming “career” I have used a number of different gaming surfaces.
I once had a table that I had glued sand to and painted, but the downsides of a table essentially made of sandpaper became apparent pretty fast, both on miniatures and on my dice-picking-up-knuckles.
I also once had a table that was made to look like it had panels and various other man-made bits and pieces on it that I used for Necromunda games. It worked ok but but never really gave me the look that I wanted. The uneven surface was a bit of a pain for placing terrain on too.
The most commonly used boards that I have had were covered in textured wallpaper and a coat or two of paint. This gave a soft surface that was good for handling miniatures on and it broke up the flatness of plain old painted boards.
I rushed when painting the my most recent wallpaper board and was unhappy with the results. Therefore having recently reorganised my mancave I decided to take the plunge and prep my gaming surfaces for what I hope will be the last time, so I bought a pair of Zuzzy mats and had them shipped from the US to Ireland.
Of the various different options available for gaming surfaces these seemed to me to be the best choice. Being able to roll them up for storage is a big deal plus they also provide a surface with some give for when miniatures fall or are lain on their sides.
Zuzzy mats are made from latex and require painting. They need to be painted mainly with washes and drybrushing as thick layers of paint will crack off the mat when it is rolled for storage. Below is a step by step of how I went about painting my urban “Wounded City” mat.

I ordered a number of 6×3″ sample pieces from Zuzzy when ordering the mats, purely to try a couple of painting techniques on. In addition Zuzzy provided me with a 11×14″ mat for free as an apology for their lengthy shipping times, so I painted that too.

The approach that I took was to drybrush, detail and wash in that order. The basic colour of the mat is grey so I decide to use that as the base for the asphalt look that I wanted to achieve. Instead of drybrushing I used a paint roller with limited paint on it, but the principle is the same.
Above is an untouched sample on the left, the second and third pieces have been rolled with a light grey emulsion house paint and the third piece has also had a wash of thinned black emulsion house paint (which is more of a very, very dark grey than pure black really). I decided that this wash was not strong enough so I added more paint to the wash mix before I tackled the full 6×4″ mat.

Above is the unpainted 6×4 mat. The wobbles visible in the shot above tend to flatten out once it has been unrolled for a while, but I took this photo just after unrolling it.

The shot above shows how the mat looked after a quick highlight coat of light grey via roller. Naturally while I desperately tried to avoid leaving a pattern from the roller I managed to drop a few blobs of paint in a couple of areas. After a fair bit of swearing and a couple of aborted attempts to remove the blobs I decided to come back to them later in the process.
Despite this it was quite fun rolling this coat on. This mat has a lot of surface detail that is easily picked up with drybrush/roller techniques. The detail on the mat is quite crisp, much more than I expected it to be really, so it was pleasant to paint when I wasnt clumsily splashing paint everywhere.

Next up was the exposed brickwork under the cracked bits of road.
I know next to nothing about the construction of roads but as far as I know there are not many bricks used under asphalt in this part of the world. If there are then they are definitely not terracotta coloured. I decided to paint them as red bricks simply because I thought that it would provide some visual interest to the board.
I used a mix of some craft colours that I had in a wash to tint the brick areas, rather than paint them. This was so that I didnt build up too much paint on the mat.

The most enjoyable part of the process so far was this stage. The asphalt represented on the board is of the “wounded” variety, so in addition to exposed subterranean brickwork there are also cracked tarmac areas. Also visible is the patchwork of tar bits and pieces that are seen on roads covering up various damage and other works done.
I stippled the tar areas with black emulsion straight from the pot. I didnt want to strictly delineate the cracked areas with paint as I thought that it would look too harsh so I painted black emulsion thinned with water into the cracked areas in a semi-random pattern.
I also stippled paint onto some of the blobs from the first stage at this point. They tended to blend in with the other supposedly damaged and repaired areas pretty well which was a relief.
I also drybrushed a lighter tone of the colour used for the terracotta brickwork wash onto the bricks.
The last stage of this rather quick process was to wash the whole mat with thinned down black emulsion paint. Apparently it is possible for the mats to warp and distort if they are drowned in water so as a precaution I dabbed up a lot of the excess wash with paper towels as I was applying it.
The wash served two purposes: it helped to define the recesses of the mat in comparison with the highlight areas while also reigning in and slightly unifying the tones used on the whole thing.
After that was done I put a dehumidifier in the room (to speed up the drying process, just in case leaving the mat exposed to watery paint for too long would cause distortion), shut the door and left the mat until the following day.
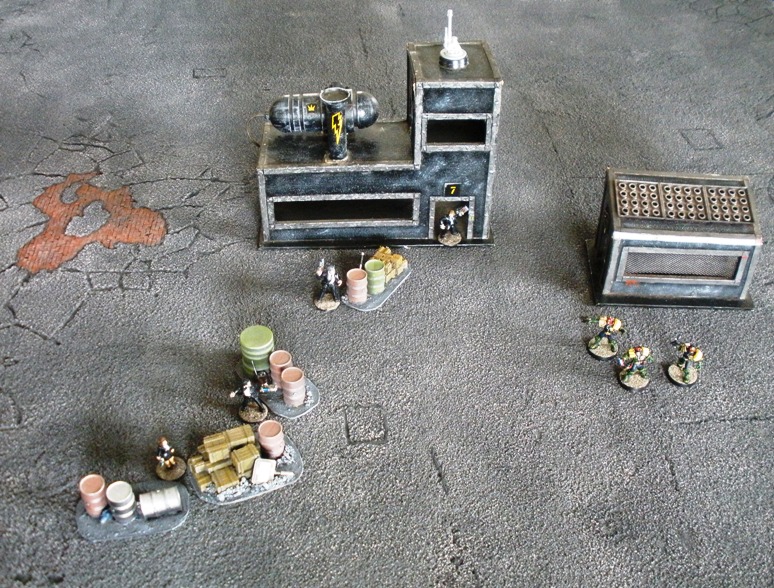
Above is a shot of the finished mat including some now twenty year old terrain. After literally working from the ground up the next on the urban terrain list is some new buildings…
Despite the ropey old terrain and dodgy lighting in the shot the surface texture is visible. Its a great surface for gaming on and I am very happy with how it turned out. It was very fast to do as well it only took easily under two hours to paint, discounting drying time. Its not that big a project or time investment and it gives a playing surface that really is pretty hard to beat.
I did my wastelands terrain mat next. I did the urban mat first as I figured that it would be a easier to do and the experience gained from that could help with the more complex wasteland mat.

You mentioned these are Warpcon, but I couldn’t remember the name! Looking good – and I’m tempted, but realistically-speaking I should’ve had one sorted by now for Leprecon (I’m doing an urban Tomorrow’s War campaign…)
LikeLike
At the time of writing I am very happy with the Zuzzy mats. I imagine that they might work out well for the portable set-ups that you use for cons.
I am very interested in what you get up to with Tomorrows War as I have had half an eye on that for a while.
I *might* be able to pop in to Leprecon as I am in Dublin that weekend. If I can then I will definitely give you a shout.
LikeLike
Figured I’d leave a thank-you note for giving me some hints on where to start – just received my own. Currently in my garage drying and I’m wincing over how I should wash it…
Anyways, thanks for the post, very informative!
LikeLike
I didnt find a lot of online information on how to paint Zuzzy mats before I painted mine, so I am glad that you got something out of it Markus.
I would like to see your take on the urban Zuzzy mat when you get it finished. feel fre to post a link up here when you do if you would like to.
Thanks for the feedback.
LikeLike
[…] thanks to Sho3box for posting an excellent […]
LikeLike
[…] dealt with my urban table needs with the Wounded City mat, the other mat that I required was one suitable for alien landscapes and post apocalyptic […]
LikeLike